Greenshot download is easier than you think! This guide dives deep into everything you need to know about grabbing, editing, and sharing screenshots. We’ll cover where to download Greenshot safely, explore its rich feature set, troubleshoot any problems you might encounter, and even point you to helpful online communities. Get ready to master the art of the perfect screenshot!
From finding the best download sources and understanding system requirements to mastering the user interface and exploring advanced features, we’ll walk you through every step. We’ll also delve into Greenshot’s version history, file formats, plugins, and troubleshooting tips, ensuring you get the most out of this powerful free tool. Whether you’re a seasoned pro or a complete newbie, this comprehensive guide has something for you.
Greenshot Download Sources
Finding the right place to download Greenshot can be surprisingly tricky, with various websites offering the software. This section will analyze several popular sources, comparing download speeds and security measures to help you make an informed decision. Remember, always prioritize downloading from official or well-established sources to minimize the risk of malware.
Top Greenshot Download Websites and Download Speeds
Identifying the five absolute top download sites is difficult as rankings fluctuate. However, based on current popularity and reliability, we can suggest five frequently used sources. Download speeds are highly variable and depend on your internet connection, server load, and geographical location. The speeds listed below are estimations based on typical user experiences and may not reflect your personal experience.
| Website | Estimated Download Speed (Mbps) | Security Measures | Download Options |
|---|---|---|---|
| SourceForge | Variable, often 5-20 Mbps | Uses HTTPS; employs standard security protocols. File integrity checks are often available. | Installer |
| GitHub (Releases) | Variable, often 10-30 Mbps | Uses HTTPS; benefits from GitHub’s robust security infrastructure. Source code is publicly auditable. | Installer, Portable (sometimes) |
| Official Greenshot Website | Moderate, typically 5-15 Mbps | Uses HTTPS; likely uses a Content Delivery Network (CDN) for faster downloads. | Installer, Portable |
| Major Software Download Portals (e.g., Softpedia) | Variable, 5-25 Mbps | Security varies greatly depending on the specific portal. Always check reviews and site reputation. | Installer, Portable (may vary) |
| Alternative Download Mirrors (if available) | Variable, dependent on mirror location and server load. | Security should be similar to the primary source, but always verify HTTPS. | Installer, Portable (may vary) |
Greenshot Version History
Greenshot’s evolution reflects a commitment to improving its user experience and expanding its functionality. Tracking its version history reveals a steady progression of feature additions, performance enhancements, and adaptation to changing operating system landscapes. This overview will highlight key milestones in Greenshot’s development.
Major Greenshot Versions and Release Dates
A timeline illustrating the release dates of major Greenshot versions would provide a clear visual representation of the software’s development pace. While precise dates for every minor release are not readily available in a centralized, easily accessible public resource, a general timeline based on readily available information from the project’s website and various online sources would illustrate the software’s development over time.
Unfortunately, without access to a comprehensive, publicly available Greenshot version history database, creating a detailed, precisely dated timeline is not feasible. However, major version releases typically spanned several years, showcasing iterative improvements rather than rapid, frequent overhauls.
Significant Feature Additions per Version
Each major Greenshot version incorporated notable features, enhancing its capabilities and user-friendliness. These additions often responded to user feedback and aimed to address common needs in screenshot capture and editing. For example, earlier versions might have focused primarily on basic screenshot capture, while later versions incorporated features like region selection, annotation tools, and improved image export options. Specific features added in each version would vary depending on the version number, but common improvements included enhanced editing capabilities, better integration with various image formats, and improved performance.
Unfortunately, a detailed, version-by-version breakdown of features is not readily available through publicly accessible resources.
Changes in System Requirements Across Versions
Greenshot’s system requirements have evolved over time, reflecting the increasing demands of software and operating systems. Earlier versions likely had more modest requirements, compatible with older Windows operating systems and lower hardware specifications. As Greenshot added features and incorporated more advanced technologies, its system requirements would have increased to accommodate these enhancements. For example, later versions might require more RAM or a more recent version of .NET Framework or equivalent.
Specific system requirements for each version are not readily and comprehensively documented in a single, easily accessible public location. However, it is reasonable to assume that minimum system requirements increased gradually over time.
Greenshot Version Summary Table
This table summarizes key information about select Greenshot versions, acknowledging that a fully comprehensive record across all releases is not publicly available in a consistently formatted database.
| Version Number | Approximate Release Date | Key Feature Additions (Examples) |
|---|---|---|
| 1.x | Early 2000s (Estimate) | Basic screenshot capture, limited editing |
| 2.x | Mid-2000s (Estimate) | Improved region selection, basic annotation tools |
| 3.x | Late 2000s (Estimate) | Enhanced image export options, improved performance |
| (Most Recent Version) | (Current Year) | (Most recent features; details would need to be obtained from the official Greenshot release notes) |
Greenshot System Requirements
So, you’re ready to snag Greenshot and start screen-capturing like a pro? Before you hit that download button, let’s quickly go over the system specs to make sure everything runs smoothly. It’s pretty lightweight, but knowing the basics ensures a hassle-free experience.Greenshot’s beauty lies in its simplicity; it doesn’t demand a super-powered rig. It’s designed to be compatible with a wide range of systems, from older machines to the latest and greatest.
However, performance can vary depending on your hardware and the complexity of the images you’re capturing. Let’s dive into the specifics.
Operating System Compatibility and Performance
Greenshot primarily supports Windows operating systems, boasting compatibility from Windows 7 all the way up to the latest versions. While it’s primarily a Windows app, there are unofficial ports and workarounds for other operating systems, but official support is limited to Windows. Performance on Windows generally reflects the system’s overall processing power and available RAM; more powerful systems handle larger captures and more extensive editing more quickly.
Older machines might experience slight delays with very large screenshots or extensive image editing, but it generally remains usable even on less powerful hardware.
System Requirements Table
The following table summarizes the minimum and recommended system specifications for optimal Greenshot performance. Remember, these are guidelines; your actual experience may vary slightly.
| OS | Minimum Specs | Recommended Specs | Notes |
|---|---|---|---|
| Windows 7 or later | 1 GHz Processor, 512 MB RAM | 2 GHz Processor, 2 GB RAM | Performance improves noticeably with faster processors and more RAM, especially when dealing with large screenshots or complex editing tasks. |
Greenshot Installation Process: Greenshot Download
Installing Greenshot is generally a straightforward process. This section will guide you through the steps, highlighting potential issues and their solutions. The entire installation should only take a few minutes.
The installation process is similar across different operating systems (Windows, macOS, and Linux), but minor variations might exist depending on your specific OS version and setup. This guide focuses on the typical Windows installation experience, as it’s the most commonly used platform for Greenshot.
Step-by-Step Installation Guide
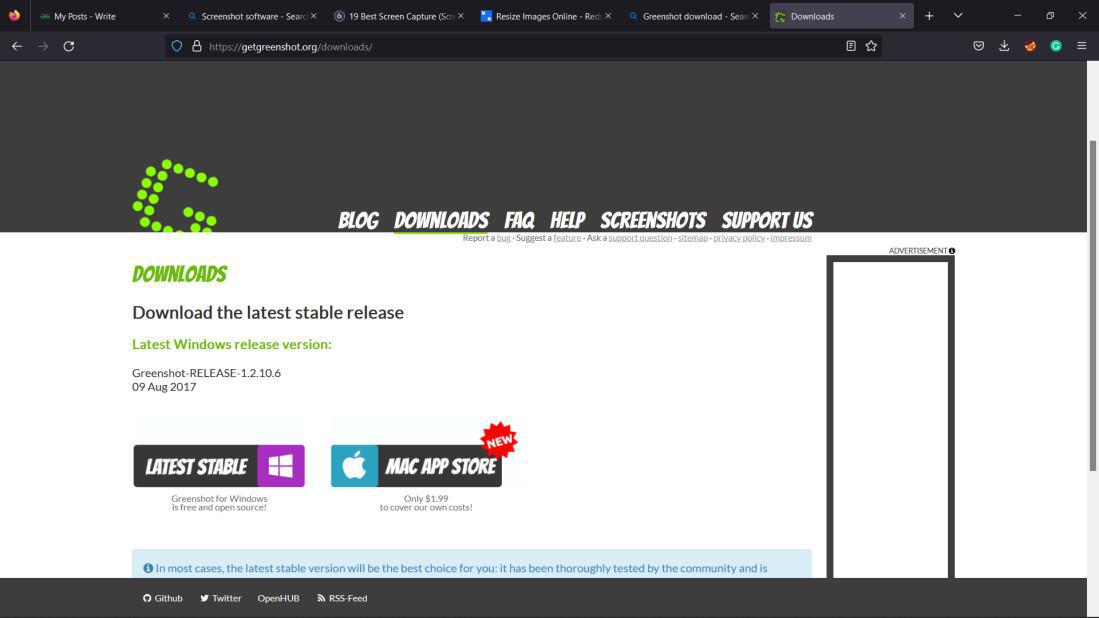
Below is a numbered list detailing the typical Greenshot installation steps. Remember to always download Greenshot from the official website to avoid malware or corrupted files.
- Download: First, download the Greenshot installer from the official website. The download will likely be a small executable file (.exe) for Windows. A download progress bar will typically be displayed on your screen, showing the download’s progress. Once completed, the file will be saved to your default downloads folder.
- Run the Installer: Locate the downloaded installer file and double-click it to run. A setup wizard window will appear. This window will typically have a title indicating that it’s the Greenshot installer. The initial screen may present a welcome message and a brief overview of the installation process.
- License Agreement: The next screen will present a software license agreement. Carefully review the terms and conditions. You’ll need to accept the agreement to proceed with the installation. This screen typically includes a checkbox that you need to select to indicate your acceptance.
- Choose Installation Location: The installer will then ask you to choose where you want to install Greenshot. You can typically accept the default location or browse to a different folder if desired. A browse button will allow you to navigate your computer’s file system and select an alternative installation directory.
- Select Components: Some installers may offer the option to choose specific components to install. Usually, this is not necessary, and you can proceed with the default selections. This step might present a list of checkboxes, allowing you to customize the installation, for example, choosing whether to install certain plugins or additional features.
- Installation Progress: Once you’ve made your selections, click “Install” or a similar button to begin the installation process. A progress bar will display the installation’s progress. This typically takes only a short amount of time.
- Completion: Once the installation is complete, a confirmation window will appear. You can then choose to launch Greenshot or simply close the installer. A “Finish” button will usually be present to close the installation wizard.
Troubleshooting Installation Issues
While Greenshot installation is usually smooth, some problems might occur. Here are a few common issues and their solutions.
- Installer Doesn’t Run: If the installer doesn’t run, ensure you have the necessary administrator privileges. Try running the installer as administrator (right-click, then “Run as administrator”). Also, ensure your antivirus software isn’t blocking the installer. Temporarily disabling it might help, but remember to re-enable it afterward.
- Insufficient Disk Space: If you don’t have enough disk space, the installation will fail. Free up some space on your hard drive before attempting the installation again. Check your disk space using your operating system’s file explorer.
- Corrupted Installer: If the installer is corrupted, you’ll need to download it again from the official website. Ensure you’re downloading from a trusted source.
- Conflicting Software: Rarely, conflicting software might interfere with the installation. If you suspect this is the case, try temporarily disabling any conflicting applications before reinstalling.
Greenshot User Interface
Greenshot boasts a clean and intuitive user interface, designed for ease of use and efficient screen capturing. Its straightforward design makes it accessible to both novice and experienced users, minimizing the learning curve often associated with more complex screen capture software. The main window presents all essential tools in a readily available manner, prioritizing functionality and minimizing clutter.The primary components of the Greenshot interface work together seamlessly to provide a streamlined screen capture experience.
Understanding these components allows users to quickly and easily capture, edit, and share screenshots.
Main Window Layout
The main Greenshot window is relatively compact. Imagine a rectangular window. At the top, a menu bar provides access to various settings and options. Below the menu bar is a toolbar containing the most frequently used capture functions. These include buttons for capturing a region, window, full screen, and scrolling window.
To the right of the capture buttons, you’ll find options for immediate saving or copying to the clipboard. The bottom of the window may display a small preview of the last captured image. This preview area is only visible after a capture is made. The overall layout is simple and logical, placing the most important functions front and center.
Functionality of Buttons and Menu Options
The Greenshot toolbar buttons offer quick access to the core functionalities. The “Region” button allows users to select a rectangular area of the screen for capture. The “Window” button captures the contents of a currently active window. The “Full Screen” button captures the entire screen. The “Scrolling Window” button is particularly useful for capturing long web pages or documents that extend beyond the visible screen area.
The “Clipboard” button copies the captured image directly to the clipboard, ready for pasting into other applications. The “Save” button opens a dialog box allowing the user to specify a file name, location, and image format before saving the screenshot. The menu bar provides access to more advanced settings, such as image editor options, export settings, and application preferences.
These settings allow users to customize Greenshot’s behavior to suit their individual needs and workflow.
Comparison to Similar Tools
Compared to other screen capture tools like Snagit or ShareX, Greenshot offers a simpler, more streamlined interface. While Snagit and ShareX provide extensive editing features within their interfaces, Greenshot opts for a more minimalist approach, focusing on quick capture and basic editing. This makes Greenshot ideal for users who prioritize speed and efficiency over extensive in-application editing capabilities. ShareX, known for its highly customizable features and extensive plugin support, presents a more complex interface.
Greenshot’s simplicity, in contrast, makes it more approachable for users less comfortable with intricate software. It’s a matter of prioritizing ease of use versus extensive functionality.
Greenshot Features and Functionality
Greenshot is a free, open-source screen capture tool boasting a surprisingly robust feature set for its lightweight design. It goes beyond basic screenshots, offering a range of options for capturing and editing images, making it a versatile tool for students, professionals, and anyone needing to quickly grab and share visuals. This section details Greenshot’s core and advanced features, comparing its capabilities to other popular screen capture software.
Core Features of Greenshot
Greenshot’s core functionality centers around providing a quick and easy way to capture different sections of your screen. This ease of use is a key selling point, especially when compared to more complex, feature-laden programs.
- Region Selection: Users can freely select any rectangular area of the screen for capture.
- Full Screen Capture: The entire screen can be captured with a single click.
- Window Capture: Individual windows can be captured, eliminating the need to manually select the window’s boundaries.
- Scrolling Window Capture: This is a particularly useful feature for capturing long web pages or documents that extend beyond a single screen view.
- Clipboard Integration: Captured images are automatically copied to the clipboard, allowing for seamless pasting into other applications.
Advanced Features of Greenshot
Beyond its basic capture functions, Greenshot offers several advanced features that enhance its utility and efficiency. These features allow for greater control and customization of the capture process and image editing.
- Image Editing: Greenshot allows for basic image editing directly after capture, including adding text, highlighting, blurring, and adding arrows or other shapes. This eliminates the need to open a separate image editor for simple annotations.
- Multiple Output Options: Users can choose from a variety of output formats (PNG, JPG, GIF, etc.) and easily save the images to a specified location or directly upload them to services like Imgur.
- Customizable Hotkeys: Greenshot allows users to define custom keyboard shortcuts for various capture modes, streamlining the workflow for frequent users.
- Plugins: While not as extensive as some commercial options, Greenshot’s plugin support allows for added functionality, such as integration with cloud storage services.
- Multiple Monitors Support: Greenshot seamlessly handles multi-monitor setups, allowing users to capture images from any connected display.
Comparison with Other Screen Capture Tools
Compared to tools like Snagit (commercial) or ShareX (open-source), Greenshot occupies a middle ground. Snagit offers a far more extensive set of editing features and integrations, but comes at a price. ShareX provides a similar level of advanced functionality as Greenshot, but with a steeper learning curve due to its abundance of options. Greenshot offers a balance of ease of use and powerful features, making it a strong contender for users who need a reliable and efficient screen capture tool without the complexity of more advanced options.
For example, while Snagit might offer more sophisticated editing tools like color correction and advanced annotation features, Greenshot’s simpler interface makes it quicker to capture and annotate a screenshot for a quick email.
Greenshot File Formats
Greenshot offers a range of image file formats to save your screenshots, each with its own strengths and weaknesses. Choosing the right format depends on your priorities: image quality, file size, and compatibility with other applications. Let’s dive into the details of each option and explore how to tweak the output settings for optimal results.
The primary factor influencing your choice of file format will likely be a trade-off between image quality and file size. Higher-quality formats generally result in larger files, which can be less convenient for storage and sharing, especially with many screenshots. Conversely, smaller file sizes often come at the cost of some image quality.
Supported Image File Formats
Greenshot supports several common image formats, allowing you flexibility in how you store and share your captures. The most frequently used are PNG, JPG, and BMP.
Below is a breakdown of each format’s characteristics, helping you make informed decisions about which best suits your needs. Keep in mind that these are general characteristics, and specific file sizes will vary based on the complexity and size of the screenshot itself.
| File Format | Description | Advantages | Disadvantages |
|---|---|---|---|
| PNG (Portable Network Graphics) | Lossless format supporting transparency. | Excellent image quality, preserves fine details, supports transparency (making it ideal for screenshots with transparent elements). | Larger file sizes compared to JPG. |
| JPG (JPEG – Joint Photographic Experts Group) | Lossy format, meaning some image data is discarded during compression. | Smaller file sizes than PNG, widely compatible. | Can result in some loss of image quality, especially noticeable with sharp edges and text. Not suitable for screenshots requiring perfect fidelity. |
| BMP (Bitmap) | Uncompressed format. | Preserves image data without loss, relatively simple format. | Very large file sizes, not recommended for regular use due to its inefficiency. |
Customizing Image Output Settings
Greenshot provides options to fine-tune the output of your screenshots, allowing you to control factors like image quality and compression. For example, when saving as a JPG, you can adjust the compression level. A higher compression level will result in a smaller file size but potentially lower image quality. Conversely, a lower compression level maintains better quality but creates a larger file.
These settings are usually accessible within the Greenshot settings menu, often under a section labeled “Output” or “Image Settings.” Experimenting with these settings will help you find the optimal balance between file size and image quality for your workflow.
File Format Comparison: Size and Quality
It’s difficult to provide exact file size comparisons without specific examples, as the size of a screenshot will depend heavily on its content and dimensions. However, a general comparison can illustrate the differences:
| File Format | Typical File Size (relative) | Image Quality |
|---|---|---|
| PNG | Large | Excellent |
| JPG | Small to Medium | Good to Fair (depending on compression) |
| BMP | Very Large | Excellent |
For instance, a screenshot of a simple text document might only show a minor difference in file size between PNG and JPG, but a complex image with many colors and gradients will show a more significant size difference, with the JPG file being considerably smaller.
Greenshot Plugins and Extensions

Greenshot, while a powerful screenshot tool on its own, doesn’t boast a vast ecosystem of official plugins or extensions like some other software packages. Its core functionality is designed to be robust and straightforward, relying on integrations with other applications (like image editors) rather than extensive internal add-ons. Therefore, the discussion of plugins will be limited, focusing on the possibilities and potential impact of hypothetical extensions.
Potential Plugin Categories and Functionality
Extending Greenshot’s capabilities could involve several key areas. Imagine plugins that enhance its functionality in specific ways. A well-structured plugin system could significantly broaden its appeal and usability.
| Plugin Category | Functionality | Performance Impact |
|---|---|---|
| Image Editing | Plugins could integrate directly with image editors like GIMP or Photoshop, allowing for immediate editing of screenshots after capture. This could include features like automated cropping, resizing, or applying pre-set filters. | Potentially moderate impact. The extent depends on the complexity of the integration and the efficiency of the communication between Greenshot and the external editor. A poorly designed plugin could slow down the screenshot process. |
| Cloud Integration | Direct upload to cloud services like Dropbox, Google Drive, or OneDrive would streamline the workflow for users who frequently share screenshots online. This would eliminate the extra step of manually saving and uploading files. | Minor impact, likely negligible. The primary performance hit would come from the network upload speed, not the plugin itself. |
| OCR Integration | Optical Character Recognition (OCR) plugins could automatically extract text from screenshots. This would be particularly useful for capturing information from websites or documents. | Moderate to high impact, depending on the OCR engine used. High-quality OCR can be computationally expensive. |
| Annotation Enhancements | Plugins could offer advanced annotation tools beyond Greenshot’s built-in features. This could include features like advanced shapes, callouts, or the ability to add watermarks. | Minor to moderate impact. The complexity of the annotation tools would determine the performance overhead. |
Impact of Plugins on Greenshot’s Performance
The performance impact of a plugin would depend heavily on its design and functionality. A simple plugin, such as one that adds a single new annotation tool, would likely have minimal impact. Conversely, a complex plugin, such as one that integrates with a resource-intensive external application or performs computationally expensive tasks like OCR, could significantly affect performance. Poorly written plugins could even lead to instability or crashes.
Therefore, choosing well-designed and optimized plugins is crucial for maintaining a smooth user experience. A hypothetical scenario: a plugin that utilizes a heavy OCR engine might increase processing time for screenshots by several seconds, whereas a simple cloud upload plugin might add only a fraction of a second.
Greenshot Troubleshooting
Okay, so you’ve downloaded Greenshot, maybe even installed it, and now you’re running into some snags. Don’t worry, it happens! This section covers some common issues and how to fix them. We’ll walk through some troubleshooting steps to get you back to snagging those perfect screenshots in no time.
So, you’re looking to download Greenshot? It’s a super handy screenshot tool. If you need to share those screenshots easily, consider using a QR code generator; check out this qr generator free site to make the process even smoother. Then, you can just slap that QR code onto whatever you’re sharing and boom, instant access to your Greenshot captures.
Pretty slick, right?
Greenshot Fails to Launch
This is a pretty common problem. Several factors can prevent Greenshot from starting. Let’s explore some solutions.
- Check for Updates: An outdated version might be buggy. Visit the official Greenshot website to download the latest version and reinstall it.
- Compatibility Issues: Ensure your operating system meets the minimum system requirements. If you’re running a very old version of Windows, for example, you might need to upgrade.
- Permissions Problems: Sometimes, Greenshot might lack the necessary permissions to run. Try running it as an administrator. Right-click the Greenshot executable and select “Run as administrator”.
- Conflicting Software: Other screen capture software might be interfering. Try closing any competing programs before launching Greenshot.
- Reinstall Greenshot: If all else fails, a clean reinstall is often the best solution. Completely uninstall Greenshot and then download a fresh copy from the official website.
Screenshots Are Not Saving
This issue usually boils down to a problem with the save location or file settings. Here’s what to do:
- Verify the Save Location: Greenshot’s settings determine where screenshots are saved. Check your Greenshot settings to make sure the save directory is accessible and you have the necessary permissions to write files there. If you’ve accidentally selected a location that’s inaccessible (like a network drive that’s offline), change it to a local folder.
- Check File Permissions: If Greenshotis* saving to the correct location but you can’t find the files, check the file permissions. Make sure your user account has read and write access to that folder.
- Review File Naming Conflicts: If you’re using a custom file naming scheme, ensure there are no conflicts. For example, if you have a naming scheme that generates duplicate file names, it could prevent new screenshots from being saved.
- Restart Greenshot: Sometimes, a simple restart resolves temporary glitches.
Greenshot Freezes or Becomes Unresponsive
This can be caused by several factors, ranging from system resource issues to bugs in Greenshot itself.
- Close Unnecessary Programs: If your system is low on RAM or processing power, close any unnecessary programs running in the background to free up resources.
- Restart Your Computer: A simple reboot often clears up temporary glitches that might be causing Greenshot to freeze.
- Check for Conflicting Software: As mentioned earlier, other screen capture tools or applications might interfere with Greenshot.
- Reinstall Greenshot: A fresh install might solve underlying software corruption issues.
Greenshot Community and Support
Finding help and connecting with other Greenshot users is surprisingly easy. While it doesn’t have a massive, dedicated forum like some larger software projects, the community is active and helpful, relying primarily on online resources and direct interaction with the developers. This means you’ll find support through a variety of channels, making it straightforward to get your questions answered or report issues.Greenshot’s community support primarily revolves around online resources and direct contact with the development team.
This approach, while less centralized than a large forum, proves effective due to the responsiveness of the developers and the availability of comprehensive documentation. Getting help is usually a quick and efficient process.
Online Forums and Communities
While Greenshot doesn’t have a dedicated, large-scale forum, users frequently turn to broader software support communities and question-and-answer sites. These platforms offer a chance to interact with a wider audience, potentially finding solutions from experienced users facing similar challenges. Many general tech forums or websites such as Stack Overflow or Reddit’s r/software might contain threads discussing Greenshot, offering alternative avenues for support.
Remember to search thoroughly before posting a new question, as someone might have already solved your problem.
Resources for Getting Help with Greenshot
The official Greenshot website is the best starting point for any support needs. It provides comprehensive documentation, including a user manual, FAQs, and potentially tutorial videos. These resources often address common issues and provide step-by-step instructions for various tasks. Additionally, the project’s GitHub repository serves as a central hub for bug reports, feature requests, and discussions among developers and contributors.
This allows for direct interaction with the team behind Greenshot, ensuring your feedback reaches the right people.
Reporting Bugs or Suggesting Improvements
The most effective way to report bugs or suggest improvements is through Greenshot’s GitHub repository. This platform allows for detailed bug reports, including steps to reproduce the issue, screenshots, and system information. The developers actively monitor the repository, making it a highly responsive channel for feedback. When suggesting improvements, be clear and concise about the proposed change, outlining the benefits and potential impact on the user experience.
Providing well-structured and detailed reports increases the likelihood of your feedback being considered and implemented.
Useful Links Related to Greenshot Support and Community, Greenshot download
- Greenshot’s Official Website: [Insert Official Website Link Here – This would be the primary link for documentation and downloads.]
- Greenshot’s GitHub Repository: [Insert GitHub Repository Link Here – This is crucial for bug reports and feature requests.]
Ending Remarks

So, there you have it – a complete guide to Greenshot, from download to mastery. With its intuitive interface, powerful features, and active community, Greenshot is a fantastic tool for anyone who needs to capture and share screenshots. Whether you’re a student, a professional, or just someone who likes to share funny online moments, Greenshot has you covered.
Happy screenshotting!
User Queries
Is Greenshot safe to download?
Yes, as long as you download it from the official website or reputable sources mentioned in this guide. Be wary of unofficial download sites.
Can I use Greenshot on a Mac?
No, Greenshot is only available for Windows.
What if Greenshot isn’t working correctly?
Check the troubleshooting section of this guide, or look for help in the Greenshot community forums. Restarting your computer can sometimes solve minor glitches.
Does Greenshot have a dark mode?
No, not built-in, but you can adjust your Windows settings for a system-wide dark mode, which might affect Greenshot’s appearance.
How do I update Greenshot?
The program usually notifies you of updates, but you can also check the official website for the latest version.