Arduino IDE: It’s the digital workbench where countless makers, students, and hobbyists bring their embedded systems dreams to life. This isn’t your grandpappy’s coding environment; it’s intuitive, powerful, and surprisingly accessible, even if you’re just starting out. We’ll dive into everything from setting up your first sketch to mastering advanced debugging techniques, making sure you’re ready to tackle any project, big or small.
From the basics of installing the software and selecting the right board to the intricacies of coding, debugging, and utilizing external libraries, this guide offers a comprehensive exploration of the Arduino IDE. We’ll cover essential functions, common pitfalls, and advanced features, providing you with the knowledge and confidence to build impressive projects.
Arduino IDE Interface Overview
Okay, so you’ve got your Arduino IDE downloaded and ready to roll. Let’s break down the interface and get you comfortable navigating it. It might seem a little daunting at first, but it’s pretty intuitive once you get the hang of it. Think of it as your digital workbench for crafting awesome projects.
The Arduino IDE is a relatively straightforward application, but understanding its key components is crucial for efficient programming. The interface is designed to be user-friendly, guiding you through the process of writing, compiling, and uploading code to your Arduino board.
Main Components of the Arduino IDE Interface
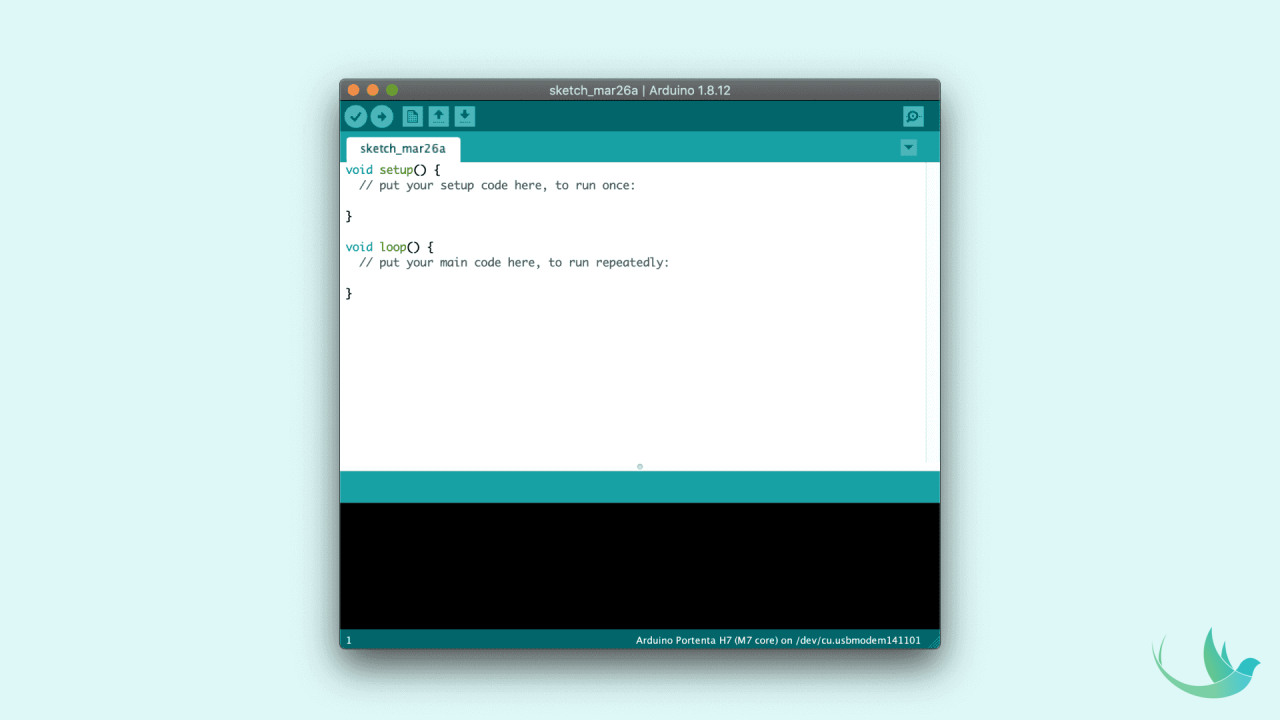
The main window of the Arduino IDE is divided into several key areas. At the top, you’ll find the menu bar, providing access to various functions. Below that is the toolbar, offering quick access to frequently used commands. The largest portion of the window is dedicated to the editor, where you write your code. Finally, at the bottom, you’ll find the console, which displays messages during compilation and upload processes.
This feedback is vital for troubleshooting.
Functions of Each Menu Option in the Arduino IDE
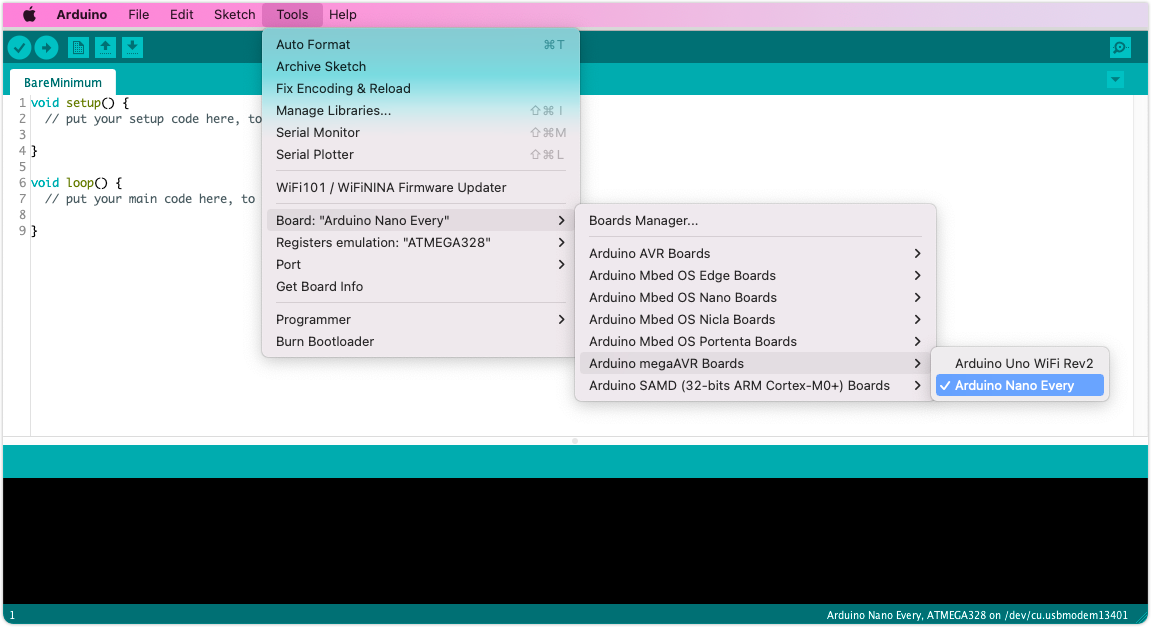
The menu bar contains options for File (creating, opening, saving sketches), Edit (standard editing functions), Sketch (managing libraries, adding external code), Tools (setting up the board and port), and Help (accessing documentation and support). Each option houses several sub-options that allow you to fine-tune your development process. For instance, under the “Tools” menu, you’ll select your specific Arduino board model and the serial port it’s connected to.
This is crucial because the IDE needs to know which board it’s communicating with to correctly upload the code.
Creating a New Arduino Sketch: A Step-by-Step Guide
Creating a new sketch is super simple. First, you’ll click “File” in the menu bar, then select “New.” This opens a blank window in the editor. You’ll then start writing your code, using the Arduino programming language (based on C++). Remember to save your work frequently! You can save your sketch by going to “File” and then “Save As.” Choose a descriptive name for your sketch and save it to a location you’ll easily remember.
Compiling and Uploading a Sketch
Before you upload your code, you need to compile it. This process checks your code for errors and converts it into a format your Arduino board understands. After saving your sketch, click the “Verify” button (it looks like a checkmark) in the toolbar. If there are any errors, the IDE will display them in the console window at the bottom.
If compilation is successful, you can proceed to upload the code.
| Step | Action | Description | Expected Outcome |
|---|---|---|---|
| 1 | Select Board | Choose the correct Arduino board from the “Tools” > “Board” menu. | IDE recognizes the board type. |
| 2 | Select Port | Choose the correct serial port from the “Tools” > “Port” menu. | IDE establishes communication with the board. |
| 3 | Compile | Click the “Verify” button (checkmark icon) in the toolbar. | Compilation messages appear in the console; indicates success or errors. |
| 4 | Upload | Click the “Upload” button (right-pointing arrow icon) in the toolbar. | Progress bar indicates upload status; successful upload message appears in the console. |
Setting up the Arduino IDE
Getting the Arduino IDE up and running is the first hurdle in your embedded systems journey. This section will walk you through the download, installation, and initial configuration, covering the most common operating systems and troubleshooting potential problems. Remember, patience is key – getting this right sets the stage for all your future projects.
Downloading and Installing the Arduino IDE
The Arduino IDE is available for Windows, macOS, and Linux. The installation process is relatively straightforward for all three, but there are minor differences. For each OS, you’ll generally download an installer package from the official Arduino website, run the installer, and follow the on-screen prompts.
Windows: The Windows installer is usually an .exe file. After downloading, double-click it and follow the wizard. You might need administrator privileges. Choose a convenient installation location and make sure to add Arduino to your PATH environment variable if prompted (this allows you to run the IDE from the command line). The installer will handle most of the process automatically.
macOS: The macOS installer is a .dmg file. Double-click it, and you’ll see a disk image mount. Drag the Arduino IDE application icon into your Applications folder. This completes the installation. You might need to adjust your security settings if you encounter any issues.
Linux: Linux installations often involve downloading a compressed archive (.tar.gz or .zip). Extract the archive to a suitable location. You can then run the Arduino IDE from the extracted folder. Some Linux distributions offer packages (like .deb or .rpm) that simplify the installation via their package manager. Refer to your distribution’s documentation for specific instructions.
Selecting the Correct Board and Port, Arduino ide
Once installed, you’ll need to tell the IDE which Arduino board you’re using and which serial port it’s connected to. This is crucial because the IDE needs this information to compile your code and upload it to the correct hardware. Incorrect settings will result in upload failures.
The board selection is done through the “Tools” menu. You’ll see options for various Arduino boards (Uno, Nano, Mega, etc.). Select the board that matches your hardware exactly. Incorrect board selection can lead to compilation errors or incorrect code execution. The port selection is also in the “Tools” menu.
This will list available serial ports on your computer. The correct port will usually be identified by a label like “COM3” (Windows) or “/dev/ttyACM0” (Linux/macOS). You’ll need to have your Arduino board connected to your computer via USB before you can see the correct port.
Troubleshooting Common Installation and Setup Issues
Installation and setup problems are common, but most are easily solved.
Problem: The IDE won’t install. Check your internet connection, ensure you have sufficient disk space, and try restarting your computer. If using an older OS, ensure it’s compatible with the IDE version.
Problem: The IDE crashes. Try updating the IDE to the latest version. Check for conflicts with other software. Consider reinstalling the IDE.
Problem: The board isn’t detected. Ensure the Arduino is correctly connected to your computer via USB. Try a different USB port. Check your computer’s device manager (Windows) or system information (macOS/Linux) to see if the Arduino is recognized. Install any necessary drivers.
Problem: The wrong port is selected. Carefully review the list of available ports in the “Tools” menu. Disconnect other USB devices that might interfere with port detection.
Arduino IDE Setup Flowchart
Imagine a flowchart. The first box would be “Download Arduino IDE Installer.” This leads to “Run Installer and Follow Prompts.” Next, a decision box: “Installation Successful?” If yes, it goes to “Select Board from Tools Menu.” If no, it goes to “Troubleshooting (Check Internet, Disk Space, etc.).” After selecting the board, the next box is “Select Port from Tools Menu.” This leads to “Verify Connection (Upload a Simple Sketch).” If the upload is successful, the process ends.
If not, it branches back to “Troubleshooting (Check Board, Port, Drivers, etc.).”
Arduino IDE Code Structure
So, you’ve got the Arduino IDE up and running, now let’s dive into the heart of it all: writing code! Arduino sketches, which are your programs, have a pretty straightforward structure that makes them easy to understand, even if you’re a coding newbie. We’ll break down the essential components and show you how to put them together to bring your projects to life.
Arduino sketches are built around two main functions: setup() and loop(). Think of setup() as the initialization phase – where you configure your hardware and get things ready. loop(), on the other hand, is where the magic happens; it’s the continuous cycle that runs repeatedly, executing your program’s core logic.
The setup() and loop() Functions
The setup() function runs only once when your Arduino board starts up. You use it to initialize variables, set pin modes (like whether a pin will be an input or output), and establish communication with other devices. The loop() function, however, runs repeatedly in an endless cycle. This is where you place the main code that controls the behavior of your project.
It’s the engine that keeps your Arduino program running. For instance, you might read sensor data in loop(), perform calculations, and then control an LED based on the sensor readings. This continuous loop is what makes Arduino projects interactive and dynamic.
Variables, Data Types, and Operators
Before we get into specific functions, let’s talk about the building blocks of your Arduino code: variables, data types, and operators. Variables are containers that store data. Data types specify the kind of data a variable can hold (like numbers, text, or true/false values). Operators allow you to perform actions on variables (like addition, subtraction, or comparison).
Here’s a table summarizing common Arduino data types:
| Data Type | Description | Size (bytes) | Range |
|---|---|---|---|
int |
Integer (whole numbers) | 2 | -32,768 to 32,767 |
unsigned int |
Unsigned integer (non-negative whole numbers) | 2 | 0 to 65,535 |
long |
Long integer (larger whole numbers) | 4 | -2,147,483,648 to 2,147,483,647 |
unsigned long |
Unsigned long integer (larger non-negative whole numbers) | 4 | 0 to 4,294,967,295 |
float |
Floating-point number (numbers with decimal points) | 4 | Approximately ±3.4 x 1038 |
boolean |
Boolean value (true or false) | 1 | true or false |
char |
Character (single letter, number, or symbol) | 1 | -128 to 127 |
String |
Text string | Variable | Variable length |
Operators include arithmetic operators (+, -,
-, /, %), comparison operators (==, !=, <, >, <=, >=), and logical operators (&&, ||, !). You’ll use these to manipulate and compare variables within your code.
Common Arduino Functions
Let’s look at some frequently used Arduino functions. These are pre-built functions that handle common tasks, saving you from writing a lot of code yourself.
pinMode() is used to configure a digital pin as an input or an output. For example, pinMode(13, OUTPUT); sets pin 13 as an output pin, allowing you to control an LED connected to it.
digitalWrite() writes a HIGH (5V) or LOW (0V) signal to a digital pin. digitalWrite(13, HIGH); turns on an LED connected to pin 13, while digitalWrite(13, LOW); turns it off.
analogRead() reads the voltage level from an analog pin. This is useful for reading data from sensors that output analog signals. For example, int sensorValue = analogRead(A0); reads the voltage from analog pin A0 and stores it in the sensorValue variable.
Working with Libraries in the Arduino IDE
Libraries are pre-written code modules that provide readily available functions and classes, saving you tons of time and effort when programming your Arduino projects. They’re basically like Lego bricks for your code – you snap them together to build more complex functionality. This section will walk you through how to effectively utilize them.Including and using external libraries streamlines your coding process.
Instead of writing code from scratch for common tasks like controlling servos or communicating via I2C, you can leverage existing libraries. This makes your code cleaner, more readable, and less prone to errors. Think of it as outsourcing the tedious parts to experts!
Including Libraries
To use a library, you need to include it at the top of your Arduino sketch using the `#include` directive. This tells the compiler where to find the necessary functions and classes. The syntax is straightforward: `#include
Examples of Commonly Used Libraries
Several libraries are essential for many Arduino projects. The Servo library provides functions for controlling servo motors, simplifying the process of controlling their position. The SPI library facilitates communication over the Serial Peripheral Interface bus, a high-speed communication protocol often used with sensors and other peripherals. The Wire library enables communication using the I2C protocol, another popular communication method known for its simplicity and efficiency.
These libraries handle the low-level details, allowing you to focus on the higher-level logic of your project.
Benefits and Drawbacks of Using Libraries
Libraries offer several advantages. They reduce development time, improve code readability, and minimize errors. They also promote code reusability and encourage a modular design approach. However, there are also some potential drawbacks. Over-reliance on libraries might hinder your understanding of underlying hardware and software principles.
Furthermore, using poorly documented or maintained libraries can lead to compatibility issues or unexpected behavior.
Installing a Library
Installing a library is a fairly simple process. Here’s a step-by-step guide:
- Open the Library Manager: In the Arduino IDE, go to Sketch > Include Library > Manage Libraries…
- Search for the Library: Type the name of the library you want to install in the search bar.
- Select the Library: Choose the correct library from the search results, paying attention to the author and version.
- Install the Library: Click the “Install” button. The IDE will download and install the library.
- Verify Installation: Once the installation is complete, you should be able to include the library in your sketch using the `#include` directive.
Debugging Arduino Code
Debugging Arduino code can feel like a wild goose chase sometimes, especially when you’re staring at a blank serial monitor or your LED refuses to blink. But fear not! With the right approach and a few key techniques, you can quickly track down those pesky bugs and get your project working smoothly. This section will cover common errors, effective debugging strategies, and real-world examples to help you become a more efficient Arduino programmer.
Common Arduino Errors
Many common errors stem from simple typos or misunderstandings of Arduino’s syntax and functionality. These often manifest as compilation errors, runtime errors, or unexpected behavior. Compilation errors, flagged by the IDE, are usually straightforward to fix, often involving missing semicolons, incorrect variable declarations, or using undefined functions. Runtime errors, on the other hand, occur during the program’s execution and might not be immediately obvious.
These can include issues like memory overflows, incorrect pin assignments, or unexpected sensor readings. Unexpected behavior often points to logic errors in your code where the program runs without crashing but doesn’t produce the desired outcome.
Debugging Techniques
The Serial Monitor is your best friend when debugging Arduino code. It provides a simple way to print variable values, track program flow, and monitor sensor readings in real-time. More advanced techniques involve using external debugging tools like logic analyzers or debuggers which can provide a deeper level of insight into your code’s execution. These tools allow you to step through your code line by line, inspect variable values, and identify the exact location of errors.
However, they are typically more expensive and require additional setup.
Using the Serial Monitor for Debugging
The Serial Monitor is a simple yet powerful tool. To use it, simply add `Serial.print()` or `Serial.println()` statements to your code at strategic points. For example, if you’re working with a sensor, you might add `Serial.println(sensorValue);` to print the sensor’s reading to the console. You can also print messages indicating the program’s progress or the values of important variables.
So, you’re messing around with the Arduino IDE, right? Getting those LEDs to blink is pretty basic, but for making killer visuals to explain your project, you might want to check out some image editing software like adobe editor for creating awesome diagrams and presentations. Then, you can use those images to document your Arduino projects, making them way more presentable.
Back to the Arduino IDE – what cool project are you building next?
Remember to include `Serial.begin(9600);` in your `setup()` function to initialize the serial communication at 9600 baud.
Debugging Scenarios and Solutions
Let’s consider a scenario where an LED connected to pin 13 refuses to light up. The code might look like this:
void setup() pinMode(13, OUTPUT);void loop() digitalWrite(13, HIGH);
If the LED doesn’t light, we can use the Serial Monitor to check if the pin is correctly configured. We could add `Serial.println(digitalRead(13));` to the `loop()` function. If this prints 0 instead of 1, we know the problem lies in the pin configuration or wiring. Another common error is forgetting to include the `pinMode()` function.Another example: Imagine you’re reading data from a sensor and the values seem erratic.
Adding `Serial.println(sensorValue);` within the loop will allow you to see the raw sensor data, helping you identify potential noise or calibration issues. You might also want to add timestamps to correlate the sensor readings with other events in your program. If the sensor data appears to be consistently wrong, check the sensor’s wiring, power supply, and data sheet to ensure it’s being used correctly.
If you suspect a problem with the sensor’s signal, you could use a logic analyzer to examine the signal directly.
Arduino IDE Serial Monitor
The Serial Monitor is an essential tool within the Arduino IDE, acting as a bridge between your Arduino board and your computer. It allows you to send data from your Arduino to your computer screen for viewing and analysis, and also allows you to send data from your computer to your Arduino. This two-way communication is incredibly useful for debugging, testing, and even creating interactive applications.The Serial Monitor’s primary function is to display data transmitted serially from your Arduino.
This data can be anything from simple text messages to sensor readings, allowing you to monitor the state of your project in real-time. Understanding how to use it effectively is a crucial skill for any Arduino programmer.
Serial Monitor Baud Rate Configuration
The baud rate is the speed at which data is transmitted over the serial connection, measured in bits per second (bps). It’s crucial that the baud rate in your Arduino code matches the baud rate configured in the Serial Monitor; otherwise, you won’t see any data. Mismatched baud rates will result in garbled or no data appearing in the monitor.
To set the baud rate in your Arduino code, you use the `Serial.begin(baudRate)` function, where `baudRate` is an integer representing the desired speed (e.g., 9600, 115200). In the Serial Monitor, you’ll find a baud rate selection dropdown menu at the bottom-right corner. You should select the same baud rate that’s set in your Arduino code. Common baud rates include 9600, 19200, 38400, 57600, and 115200.
Higher baud rates allow for faster data transmission but may not be supported by all hardware configurations.
Using the Serial Monitor for Debugging
The Serial Monitor is an invaluable debugging tool. By strategically placing `Serial.print()` or `Serial.println()` statements throughout your code, you can monitor the values of variables, the execution flow, and identify potential problems. For example, if a sensor reading is unexpectedly high or low, printing that value to the Serial Monitor can help pinpoint the source of the error. You can also print debugging messages to track the program’s progress and confirm that certain sections of code are executing correctly.
The ability to see real-time variable values provides a level of insight not easily achieved through other debugging methods.
Using the Serial Monitor for Data Visualization
Beyond debugging, the Serial Monitor can also be used for simple data visualization. While not as sophisticated as dedicated plotting software, it allows you to see trends and patterns in your data. For instance, you could print sensor readings every second and observe how they change over time. This can be useful for quick checks of sensor performance or for getting a general feel for the data before employing more advanced analysis techniques.
By carefully formatting the output (e.g., using tabs or commas to separate data points), you can make the data easier to interpret.
Examples of Serial Monitor Use
Let’s imagine you’re building a temperature monitoring system. You could use the following code to send the temperature reading to the Serial Monitor: int sensorPin = A0; // Analog pin connected to the temperature sensorint sensorValue;void setup() Serial.begin(9600); // Initialize serial communication at 9600 baudvoid loop() sensorValue = analogRead(sensorPin); Serial.print("Temperature: "); Serial.println(sensorValue); // Print the sensor value to the Serial Monitor delay(1000); // Wait for 1 secondThis code reads the sensor value, prints it to the Serial Monitor with a descriptive label, and then waits for one second before repeating the process. This simple example showcases how easily you can integrate Serial Monitor output into your projects.
Different Serial Monitor Implementations
While the Arduino IDE’s built-in Serial Monitor is the most common, other Serial Monitor implementations exist, often offering enhanced features. These differences usually involve added functionalities like plotting capabilities, data logging, and improved formatting options.
| Serial Monitor | Key Features |
|---|---|
| Arduino IDE Serial Monitor | Basic text display, baud rate selection, simple data viewing |
| Third-party Serial Monitor applications (e.g., RealTerm) | Advanced features like data logging, plotting, customizability, and support for various protocols |
Advanced Arduino IDE Features
Okay, so you’ve got the basics down – you can write, compile, and upload code. But let’s level up your Arduino game with some seriously helpful IDE features that’ll make your coding life way easier and more efficient. We’re talking about features that go beyond the basics and help you write cleaner, more maintainable code.Autocompletion is a lifesaver, especially when working with libraries or longer functions.
It helps you avoid typos and speeds up your coding process significantly. Code commenting and formatting improve readability, making your code easier to understand, debug, and maintain – both for yourself and others who might work with your projects later. Version control is essential for managing your projects, tracking changes, and collaborating with others. Finally, we’ll look at how to use external editors, which can offer advanced features like syntax highlighting and code completion that are not available in the standard Arduino IDE.
Autocompletion
The Arduino IDE’s autocompletion feature is a built-in code-completion tool that suggests possible code completions as you type. It analyzes your code and provides a list of relevant functions, variables, and s. To use it, simply start typing a function name or variable, and a pop-up window will appear displaying potential matches. Using the arrow keys, you can select the desired completion and press the Tab key to insert it into your code.
This significantly reduces the risk of typos and speeds up coding, particularly when dealing with complex functions or long variable names. For instance, if you start typing `Serial.`, the autocompletion will suggest options like `Serial.begin()`, `Serial.print()`, and `Serial.println()`. This saves you time and effort by eliminating the need to manually type out the entire function name.
Code Commenting and Formatting
Clean, well-commented code is crucial for maintainability and collaboration. Comments in your code explain what the code does, not how it does it (that’s what the code itself is for!). Use `//` for single-line comments and `/*
/` for multi-line comments. Consistent formatting, such as using indentation and spacing, improves readability. For example
// This function reads a sensor value and sends it to the serial monitor.int readSensor() int sensorValue = analogRead(A0); // Read the sensor value from analog pin A0. return sensorValue;
Good formatting makes it much easier to quickly grasp the structure and logic of your code, reducing debugging time and making future modifications straightforward.
Version Control for Arduino Projects
Version control systems like Git are invaluable for managing your Arduino projects. They allow you to track changes to your code over time, revert to previous versions if necessary, and collaborate with others on the same project. Using a platform like GitHub or GitLab provides a central repository for your code, making it easy to share, back up, and manage different versions of your project.
This is especially beneficial for larger or more complex projects where multiple developers might be working simultaneously. Imagine accidentally deleting a crucial part of your code – with version control, you can easily recover it.
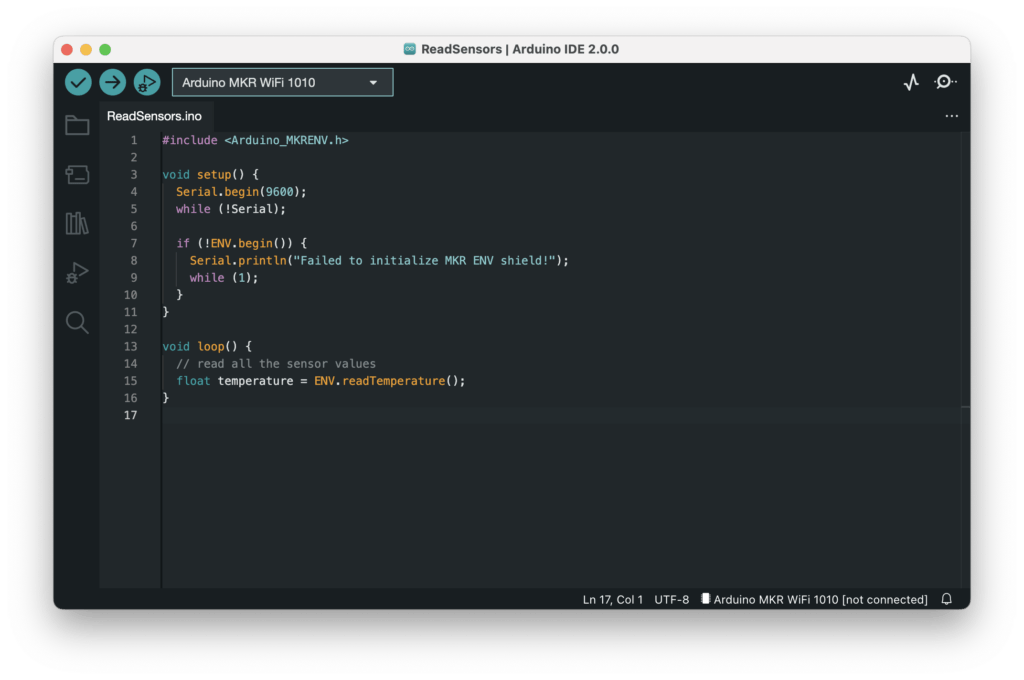
External Editors and Integration
While the Arduino IDE is perfectly functional, some developers prefer using external editors like Visual Studio Code, Atom, or Sublime Text. These editors often offer advanced features like more sophisticated code completion, syntax highlighting, and debugging tools. Many external editors can be integrated with the Arduino IDE through plugins or extensions. This allows you to write your code in the external editor and then compile and upload it using the Arduino IDE.
This workflow leverages the strengths of both tools, providing a more powerful and efficient development environment. For example, Visual Studio Code, with the Arduino extension, offers features like IntelliSense (intelligent code completion) and debugging capabilities that are more robust than those in the standard Arduino IDE.
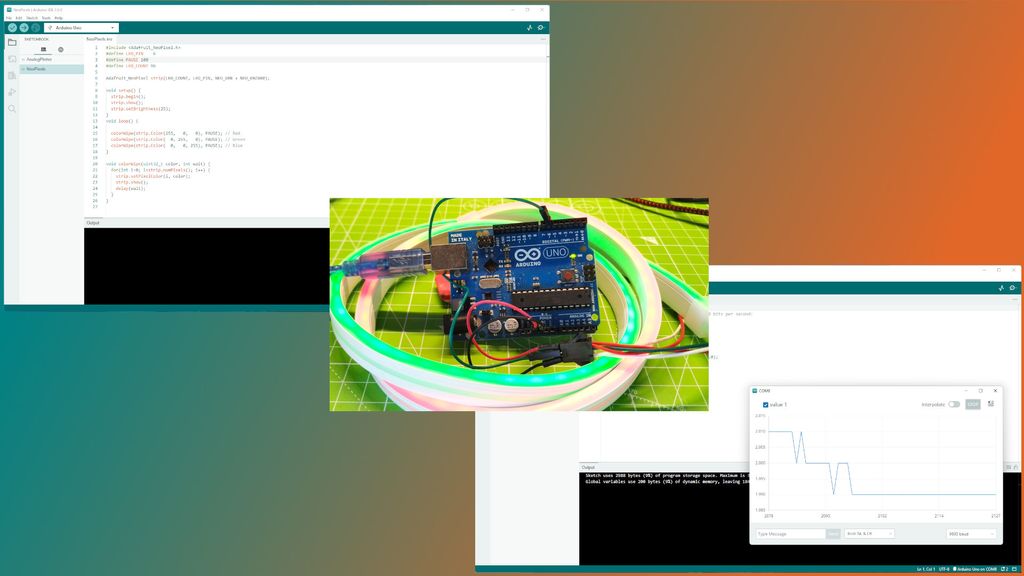
Arduino IDE and External Hardware
Interfacing your Arduino with the outside world is where the real fun begins! This section dives into connecting various sensors and actuators to your Arduino, writing code to control them, and troubleshooting any hiccups along the way. We’ll cover common components and provide code snippets to get you started.Connecting sensors and actuators to your Arduino involves understanding their specifications, particularly voltage levels and communication protocols (analog, digital, I2C, SPI).
Improper connections can damage your hardware, so careful attention to datasheets is crucial. Remember, safety first! Always double-check your wiring before powering anything up.
Interfacing with Sensors and Actuators
Connecting external hardware to the Arduino involves understanding the hardware’s specifications and choosing the appropriate pins on the Arduino board. Most sensors and actuators connect via digital pins (for on/off control) or analog pins (for reading variable values like temperature or light). Some more advanced components use communication protocols like I2C or SPI for efficient data transfer. The process usually involves connecting the sensor’s power, ground, and signal pins to the Arduino.
The signal pin is then read in your Arduino code using the appropriate functions ( digitalRead() for digital, analogRead() for analog). Actuators are controlled by writing values to their respective pins using digitalWrite() or analogWrite().
Example Code for Controlling Hardware
Let’s look at a couple of examples. First, controlling an LED (a simple actuator):“`cppconst int ledPin = 13; // LED connected to digital pin 13void setup() pinMode(ledPin, OUTPUT); // Set pin 13 as an outputvoid loop() digitalWrite(ledPin, HIGH); // Turn LED ON delay(1000); // Wait for 1 second digitalWrite(ledPin, LOW); // Turn LED OFF delay(1000); // Wait for 1 second“`Next, reading data from a potentiometer (a variable resistor, acting as a sensor):“`cppconst int potPin = A0; // Potentiometer connected to analog pin A0void setup() Serial.begin(9600); // Initialize serial communicationvoid loop() int sensorValue = analogRead(potPin); // Read the potentiometer value Serial.println(sensorValue); // Print the value to the serial monitor delay(100); // Small delay“`
Troubleshooting Hardware Issues
Troubleshooting hardware problems often involves a systematic approach. First, visually inspect all connections to ensure they are secure and correctly wired. Then, check the power supply to make sure the Arduino and connected components are receiving the correct voltage. Use the serial monitor to print debug information, such as sensor readings, to help identify the source of the problem.
If you suspect a faulty component, try replacing it with a known good one. Online forums and datasheets are invaluable resources for finding solutions to common problems. Remember to disconnect power before making any changes to the wiring.
Common Sensors and Arduino Code Snippets
| Sensor | Description | Code Snippet |
|---|---|---|
| Ultrasonic Sensor (HC-SR04) | Measures distance using ultrasonic waves. | long duration, distance; |
| Temperature Sensor (LM35) | Measures temperature in Celsius. | float temperature = analogRead(tempPin) - 0.488; |
| Light Dependent Resistor (LDR) | Measures ambient light levels. | int lightLevel = analogRead(ldrPin); |
Creating Custom Functions in Arduino IDE
Writing reusable code is key to making your Arduino projects cleaner, more efficient, and less prone to errors. Custom functions are your secret weapon for achieving this. They let you encapsulate blocks of code that perform specific tasks, making your main program easier to read and maintain. Think of them as mini-programs within your larger program.Custom functions help avoid repetitive code, a major source of frustration for programmers.
By defining a function once, you can call it multiple times from different parts of your sketch, saving you time and effort while reducing the risk of inconsistencies. They also make debugging much easier because you can test and troubleshoot individual functions separately. This modular approach leads to more robust and understandable Arduino projects.
Custom Function Syntax
Creating a custom function in Arduino involves specifying its return type, name, parameters (inputs), and the code it executes. The general syntax looks like this:
return_type function_name(parameter_type parameter1, parameter_type parameter2, ...) // Function body: Code to be executed return value; // If the return type is not void
The `return_type` specifies the type of data the function sends back (e.g., `int`, `float`, `void` if it doesn’t return anything). `function_name` is the name you choose for your function (follow standard naming conventions). `parameter_type` and `parameter1`, `parameter2`, etc., define the input data types and their names. The function body contains the code that performs the function’s task. Finally, `return value` is the data returned by the function (only if the return type is not `void`).
Examples of Custom Functions
Let’s illustrate with some practical examples.
Example 1: Calculating the Average of Two Numbers
This function takes two integers as input and returns their average as a float:
float calculateAverage(int num1, int num2) return (float)(num1 + num2) / 2;
In your main program, you would call it like this:
int a = 10;int b = 20;float avg = calculateAverage(a, b); // avg will be 15.0
Example 2: Blinking an LED
This function blinks an LED connected to a specific pin for a specified duration:
void blinkLED(int ledPin, int delayTime) pinMode(ledPin, OUTPUT); digitalWrite(ledPin, HIGH); delay(delayTime); digitalWrite(ledPin, LOW); delay(delayTime);
You would use it in your `loop()` function like this:
int ledPin = 13;int blinkDelay = 500; // millisecondsvoid loop() blinkLED(ledPin, blinkDelay);
This demonstrates how a single function can encapsulate a common task, making the main loop cleaner and more focused.
Improving Code Organization and Readability
Using custom functions significantly improves code organization and readability. By breaking down complex tasks into smaller, manageable functions, you create a more structured and understandable program. This is particularly beneficial for larger projects where code can quickly become unwieldy. The improved readability also simplifies debugging and future modifications. For instance, if you need to change how the LED blinks, you only need to modify the `blinkLED` function, rather than searching through your entire `loop()` function.
This modular approach is a best practice for any Arduino project beyond a simple beginner’s example.
Arduino IDE and Project Management
Okay, so you’ve got your basic Arduino programs down, but now you’re tackling something bigger – a real project! This means you’ll need to organize your code, and that’s where good project management comes in. Think of it like building a house: you wouldn’t just throw all the materials in a pile, right? You need a plan, and that’s what we’re going to create for your Arduino projects.Managing a large Arduino project effectively is crucial for maintainability and collaboration.
A well-structured project simplifies debugging, updates, and future expansion. Let’s dive into strategies to keep your code organized and your sanity intact.
Organizing Large Arduino Projects with Folders and Subfolders
Using folders and subfolders is the most effective way to structure your Arduino projects. This allows for clear separation of different parts of your code, making it easy to find specific files and keeping things tidy. For example, you might have a folder for sensor code, another for motor control, and a third for data logging. This modular approach makes it simple to reuse code components across different projects and to easily understand the overall project architecture.
Nested folders can be used to further subdivide code related to specific features or functionalities within larger modules. Imagine a project involving a robotic arm. You might have a main folder, then subfolders for “arm_control,” “sensor_reading,” “communication,” and “data_processing.” Each subfolder contains the relevant .ino files and any supporting files like header files (.h) or configuration files.
Best Practices for Naming Conventions in Arduino Projects
Consistent naming conventions are essential for readability and maintainability. Choose descriptive names for your files and folders, avoiding abbreviations or jargon that might not be clear to others (or even to your future self!). Using a consistent structure, like “ProjectName_Module_Description.ino,” helps maintain a logical and understandable hierarchy. For example, `RobotArm_MotorControl_Stepper.ino` clearly identifies the file as related to stepper motor control within the larger RobotArm project.
Also, stick to lowercase letters with underscores separating words for file names and folder names – it’s a widely accepted convention and helps avoid potential conflicts.
Sample Project Structure
Here’s an example of a well-organized project structure. This isn’t the
only* way to do it, but it illustrates the principles we’ve discussed.
- ProjectName/
- src/ (Source code)
- lib/ (Libraries)
- data/ (Data files, configurations)
- doc/ (Documentation)
- ProjectName/src/
- main.ino
- sensors.ino
- actuators.ino
- communication.ino
- ProjectName/lib/
- MyCustomLibrary.h
- MyCustomLibrary.cpp
This structure separates the main program (`main.ino`) from supporting functions and libraries, making it easier to manage and update the code. The use of descriptive folder names and file names enhances readability and organization. Remember, adapting this structure to your specific project needs is perfectly acceptable – the key is consistency and clarity.
Arduino IDE Alternatives and Comparisons
Okay, so you’ve mastered the Arduino IDE, right? But did you know there’s a whole world of other IDEs out there that can make your Arduino programming life easier, or at least different? Let’s dive into some alternatives and see how they stack up. We’ll look at their features, pros, and cons to help you decide if switching is right for you.
Alternative IDEs for Arduino
Several IDEs offer support for Arduino programming, each with its own strengths and weaknesses. Popular options include PlatformIO, Visual Studio Code with the Arduino extension, and Eclipse with the Arduino plugin. These alternatives often provide features not found in the standard Arduino IDE, such as enhanced debugging capabilities, better project management tools, and cross-platform compatibility.
Comparison of Arduino IDE Features
Let’s compare the core features. The standard Arduino IDE is known for its simplicity and ease of use, perfect for beginners. However, more advanced users might find its debugging tools limited and its project management capabilities somewhat lacking. PlatformIO, on the other hand, boasts powerful debugging and project management features, along with support for multiple frameworks and hardware platforms beyond Arduino.
Visual Studio Code, with its extensibility, provides a highly customizable development environment, while Eclipse offers a mature and robust platform for larger, more complex projects.
Advantages and Disadvantages of Alternative IDEs
- PlatformIO: Advantages include excellent cross-platform support, advanced debugging, and built-in library management. Disadvantages might include a steeper learning curve compared to the Arduino IDE for absolute beginners.
- Visual Studio Code with Arduino Extension: Advantages include a highly customizable environment, excellent code completion, and integration with other development tools. Disadvantages could be that setting up the environment might require more initial configuration compared to the simplicity of the standard Arduino IDE.
- Eclipse with Arduino Plugin: Advantages include robust project management for large projects, advanced debugging, and a mature IDE with many features. Disadvantages are that it can feel more complex and resource-intensive than simpler alternatives.
Key Feature Comparison Table
| Feature | Arduino IDE | PlatformIO | Visual Studio Code | Eclipse |
|---|---|---|---|---|
| Ease of Use | Excellent | Good | Moderate | Moderate to Difficult |
| Debugging Capabilities | Basic | Excellent | Good | Excellent |
| Project Management | Basic | Excellent | Good | Excellent |
| Cross-Platform Support | Good | Excellent | Excellent | Excellent |
| Extensibility | Limited | Good | Excellent | Excellent |
Closing Summary

So, there you have it – a whirlwind tour of the Arduino IDE! Whether you’re a seasoned programmer or a curious newbie, we hope this guide has armed you with the knowledge to confidently navigate the world of embedded systems. Remember, the best way to learn is by doing, so fire up that IDE, experiment, and don’t be afraid to break a few things along the way (it’s part of the learning process!).
Happy coding!
User Queries
What’s the difference between the `setup()` and `loop()` functions?
`setup()` runs once when your Arduino starts, initializing things like pin modes. `loop()` runs repeatedly, containing the main logic of your program.
How do I choose the correct serial port?
It depends on your operating system. In Windows, it might look like “COM3,” while on macOS or Linux, it might be something like “/dev/ttyACM0.” The Arduino IDE usually detects connected boards automatically; if not, check your system’s device manager or equivalent.
What if my code isn’t uploading?
Double-check your board selection, the serial port, and that your Arduino is properly connected. Make sure you’ve saved your code and that you have the correct drivers installed. If problems persist, search online for specific error messages you encounter.
Can I use the Arduino IDE with other microcontrollers?
Yes! You can install additional boards support packages within the Arduino IDE to work with various other boards, expanding its capabilities far beyond just Arduino boards themselves.
Where can I find more help if I get stuck?
The Arduino website has extensive documentation and a vibrant community forum brimming with helpful people. Don’t hesitate to search for your specific problem – chances are, someone else has encountered it already!